One of the essential skills you will master through your online Salesforce training is user access and permissions management. You can maintain a secure and efficient environment within the Salesforce platform by controlling various accesses, like who can access data, what kind of data they can access, and what actions they perform. Here comes the Permission Sets handy.
Permission sets enhance the flexibility of user access management and allow you to tailor user access to meet specific business needs. The Salesforce admins are required to manage user permission sets, a collection of settings and permissions, that offer extended functional access to various tools and features without individual user profile alteration. They utilize permission sets frequently to provide users with the right tools, functionalities, and data access for effective role accomplishment. Online Salesforce admin training programs teach the students to give special access to specific users temporarily or permanently without impacting other users through the live projects.
This technical guide will walk you through the step-by-step instructions for adding a permission set to a Salesforce user.
Know How Can You Add Permission Sets To A Salesforce User?
Step: 1
Login salesforce org
- As a Salesforce admin, you get administrator privileges in the platform account so log in with it. Your role includes the power to manage Permission Sets and assign them to other users.
Step: 2
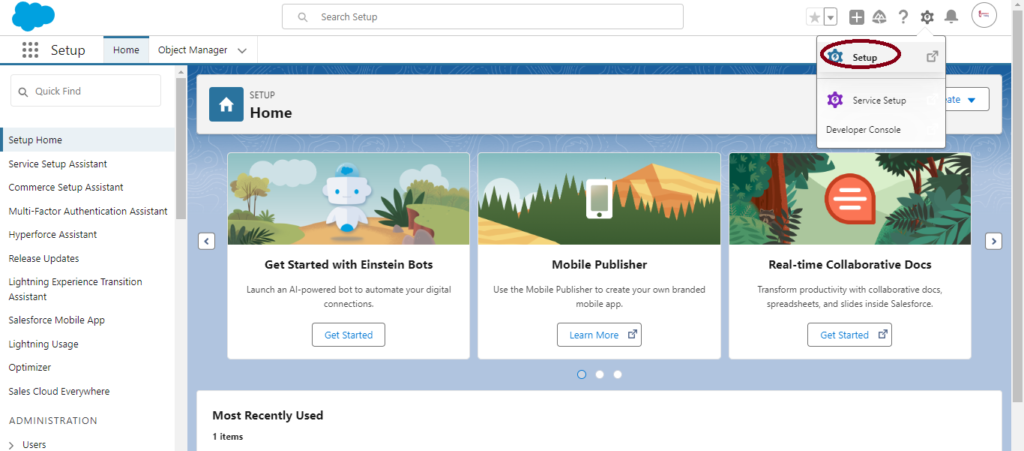
Click setting in the right corner
- You will see a gear icon called settings in the upper-right corner of the screen. Click on it.
- You will get the dropdown menu so select the Setup option.

Step: 3
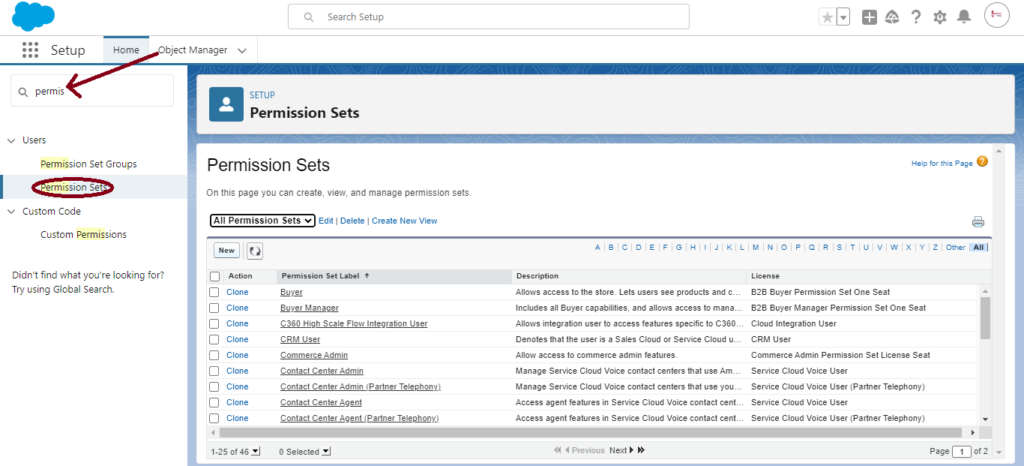
Search permissions in the left search bar and see the permission set
- Now, in the left sidebar, the quick find box is available. You have to type Permission Sets to search for it and click on it.
- Setup – > Quick Find Box -> Permissions Set
- Here you can assign a Permission set for specific users by clicking on a specific Permission Set.

Step: 4
Select the user
- A list will appear on the screen with all user names from your organizations. You have to simply tick on the boxes of Permission Set that appear next to the user names to activate their access.
- After setting up all the configurations, click on the Next Button to move forward.

Step: 5
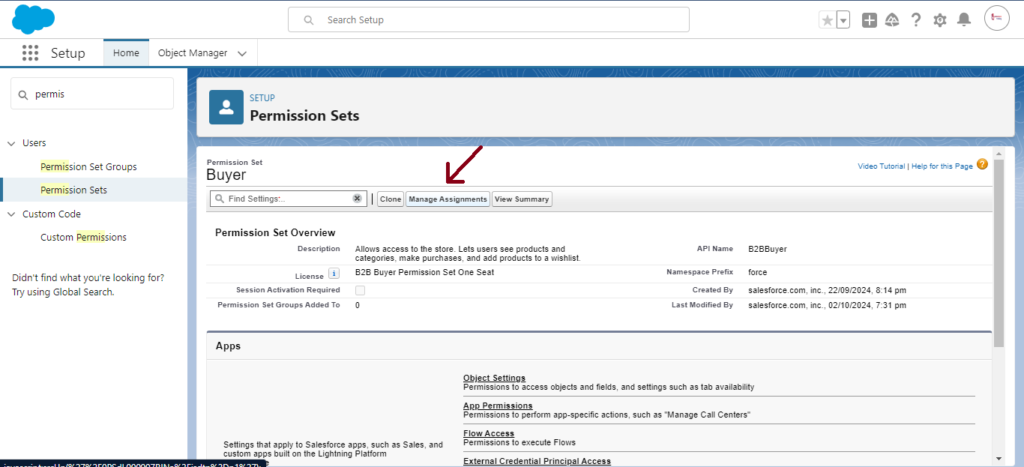
Go to Manage Assignments
- There is a Manage Assignment Button on the Permission Set details page. It helps in checking the comprehensive list of users already assigned to a specific Permission Set.

Step: 6
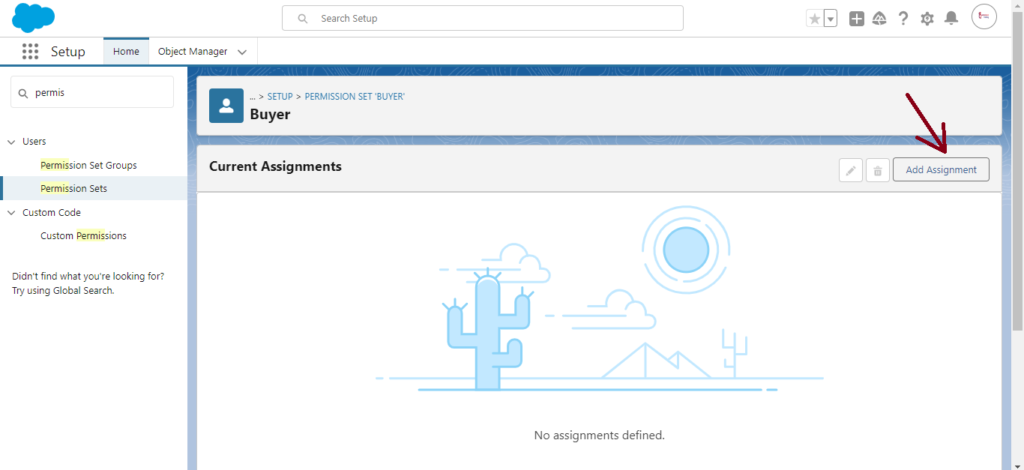
Add assignments to the user
- Recheck and ensure you have chosen the correct users and click on the Add Assignments Button. It will start assigning the Permission sets to new users.
- Then click on the Assign button to complete the assignment.
Another Easy Method to Add a Permission Set to a Salesforce User
There is another simplified way to complete the process of assigning a Permission set to a Salesforce user within your organization. Let’s learn the quickest approach:
Step 1: Search User in the Search Bar
- At the top of the Salesforce page, you will see the search bar.
- Here you have to enter the user name for the Permission Set assignment. Click on their name. It will open a new page with an overview of User Details.
Step 2: Click Permission Set Managements
- You will find the Permission Set Assignments section on the user detail page.
- Directly reach the page where you can manage all the Permission Sets for that particular user by clicking on the Permission Set Management Button.
Step 3: Add Permission Sets
- Now add the Permission Set by clicking on the Add Button. The list of available Permission sets will appear with the Enabled Permission Sets.
Step 4: Add Assignment and Save It
- Check the boxes next to the user name to enable the desired Permission Set.
- Finalize the Assignment by clicking on the Save button above.
And you are done!
This method provides a quick and straightforward way to add Permission Sets directly from the user’s profile page without navigating through the Setup menu.
Best Practices for Using Permission Sets
Following the right strategy and best practices are crucial to succeed in your tasks. That’s why here are the 3 vital best practices that you must keep in mind while using Permission Sets in Salesforce are as follows:
- Use Permission Sets to Grant Additional Access: Permission Sets are ideal for providing temporary or specific access to users. Always use Permission Sets instead of creating new profiles.
- Create Permission Set Groups: If you have multiple Permission Sets that you often assign together, create a Permission Set Group to streamline the process.
- Regularly Review Permission Sets: Periodically review user Permission Set assignments to ensure they have the appropriate level of access.
Final Thoughts
If you are preparing for the Salesforce admin certification exam, you must learn the Permission set topic. This concept is very important for every organization as it helps to assign specific roles with limited access depending on their requirements for the work. It is a flexible and efficient way to manage user permissions and control access in Salesforce. This guide with step-by-step instructions will make it easier for you to perform the complete process in your Salesforce CRM platform. If you have any further questions or need any guidance, we have experts with years of experience who can provide you with answers. Also, you can start with online Salesforce admin training to achieve success in your certification exam. Don’t wait for too long! Just join the classes today and start 2025 with certified skills in Salesforce admin.


